
- Mark Darden
- March 18, 2023
- 12:02 pm
- No Comments
Check Disk (CHKDSK) is a built-in Windows operating system fix utility. The tool maintains the health and performance of the computer’s hard drive. The command-line fix tool fully scans HDD and automatically detects and repairs disk errors that can cause slow PC speed and system errors or crashes. Additionally, the utility works as a Windows system optimizer that can improve the hard drive’s performance to the maximum on Windows 11 and Windows 10, also on older OS versions. The Check Disk utility can’t fix the physical damage to the disk but can certainly fix hard drive errors to prevent further damage.
| Utility name | Check Disk (CHKDSK) |
| Developer | Microsoft |
| Specification | Windows operating system in-build tool |
| Supported OS | Windows 11, Windows 10, Windows 8.1, Windows 8, Windows 7, Windows Vista, Windows XP |
| Features | Disk utility can detecting and fix disk errors, check file system integrity, consolidate fragmented files, free up disk space, |
Table of Contents
What Is Chkdsk and How It Works?

The Check Disk utility can detect and fix various types of hard drive and system errors. It can identify and repair bad sectors, cross-linked files, lost clusters, and directory errors, file system metadata errors, file system integrity errors. Also, the utility can check the system file integrity and ensure that files are stored correctly. If it is not, it can find and repair the issue.
The Check disk fix tool can consolidate fragmented files on the hard drive. This function significantly reduces the time to access files and improves system performance. Check Disk tool can free up disk space by deleting unused file fragments and recovering lost clusters.
Last but not least function of Check Disk utility is to recover lost data of readable information from bad sectors. The utility relocates data from the bad sector to the healthy sector on the disk. This can fix disk faults and improve overall system performance.
When to Use Check Disk (CHKDSK) Utility on Windows
Check Disk CHKDSK to repair HDD is a powerful fix utility that maintains disk health and performance on Windows operating systems. Computer users need to know the warning signs when the utility should be launched on. NOTE: After the Check Disk utility finishes its job, it is to recommended to run SFC and DISM scans to ensure optimal system performance. To keep a healthy and optimized computer’s hard drive, it is recommended to use a CHKDSK scan at least once a month, even if you don’t see any errors or system triggers.
- When file or folder become inaccessible
- Slow system performance
- Programs are crashing or freezing
- File or folder names appear as gibberish
- After a system crash or unexpected shutdown
- Disk errors or warnings
- Unusual noises from the hard drive
How to Run Chkdsk (Check Disk) Utility on All Windows OS Versions
Our team has tested and provided 8 methods for running Chkdsk (Check Disk) fix utility on all Windows OS versions (Windows 11, Windows 10, Windows 8, Windows 7, Windows Vista, and Windows XP). Computer users will find a step-by-step guide how to run the disk fix tool via File explorer, Task manager, CMD, Powershell, Windows recovery mode, batch file and schedular scan. In the table below you will find all available commands on the Check Disk utility.
We recommend simultaneously using the most effective two commands at the same time – chkdsk /f /r /x means that the tool will automatically fix errors and bad sectors on the volume. Note that this scan can take a longer amount of time to complete task, especially if you’re running it on a large drive with many files. For faster scan, you can use just the error fix command – chkdsk /f.
Sometimes you can get a massage: Chkdsk cannot run because the volume is in use by another process. Would you like to schedule this volume to be checked the next time the system restarts? In this case you need to press Y letter on the keyboard and restart the PC to start the automatic scan. This can help ensure that the scan is able to run without interference from other processes or applications.
| COMMAND | Description | /F | Fixing errors during the disk scan |
|---|---|---|
| /V | Displays the name of each file in every directory was checked | |
| /R | Locates bad sectors on the disk and recovers any readable information | |
| /L |
Changes the the log file size /l[: |
|
| /I | Performs a light check of index entries | |
| /C | Fast scan (Does not check cycles within the folder structure) | |
| /X | Forces the volume to dismount before the scan begins | |
| /B | Re-generates bad clusters on the volume and scans for errors | |
| /scan | Scan the disk in online mode | |
| /perf | Performs fast disk scan but uses more system resources. | |
| /spotfix | Spot fix on the Hard Drive | |
| /offlinescanandfix | Scans and fixes HDD in the offline mode | |
| /freeorphanedchains | Use it only on FAT/FAT32/exFAT The command realises orphaned cluster chain instead of recovering contents. | |
| chkdsk | Checks the full hard drive for errors but do fix them. |
Run Chkdsk Fix Utility Using File Explorer In Windows
Running the Check Disk utility through File Explorer is the easiest method, even for a beginner-level of PC users. Provided step-by-step guide works on Windows 11, Windows 10, Windows 8 and Windows 7 operating systems. The build-in Microsoft disk fix utility will scan the computer disk immediately or offer to schedule the scan until the next computer restart. This method is user-friendly and can save time compared to using Command Prompt or other tools.
- Open File Explorer by pressing the Windows+E keys on the keyboard.
- Left-click on the hard drive you want to scan and repair.
- On the drop-down menu, select the Properties option.
- Go to the Tools tab on the drive properties window.
- On the error checking section, click the button check.
- Confirm by clicking the scan drive option.


Run Chkdsk 0n The Task Manager in Windows
Running the Check Dick utility via Task Manager is a good option for Windows 11 and Windows 10 users. In the Command Prompt, type chkdsk C: /f /r /x (replace C: with the drive letter you want to scan). It can happen that another process can use the volume the moment you want to run a scan. The utility will prompt schedule the task after the computer restarts. To confirm it, type Y and press Enter. The fix utility will load and start the scan automatically before the Windows OS loads.
- Press and hold the Ctrl+Shift+Esc at the same time to open the Task Manager.
- On the Task Manager window, click on the File menu in the top-left corner and select the Run new task option.
- In the Create new command line, type chkdsk /f /r /x and check the box Create this task with administrative privileges.
- Click the OK button to start the scan.
- If needed, confirm the scan after the computer restarts, click Y button.


Run Check Disk (CHKDSK) in Command Prompt on Windows Operating Systems
Running Check Disk in the Command Prompt is a powerful and most widely applicable method for fixing hard drive on all Windows operating systems starting from Windows 11 and ending with Windows XP. Applying this method, it is important to run CMD as an Administrator. In the Command Prompt, users can use any specific command to scan and repair a drive.
- Click on the Windows logo (Start) button on the bottom left side of your screen.
- In the search box type CMD.
- On right side of Command Prompt window select Run as administrator.
- In the Command Prompt window type chkdsk /f /r /x and press Enter to start fix utility.
- Confirm the scan after the computer restarts. If needed, click the Y button.


Run Chkdsk (Check Disk) tool in Windows PowerShell
Windows Powershell provides more functionality and features compared to the Command Prompt, and it is an excellent option for Windows 11 and Windows 10 operating system users. To get full access to the Check Disk fix utility, it is important to run Powershell as administrator.
- On the bottom left side of screen right-click on the Windows icon to open menu.
- From the menu choose Windows PowerShell (Admin).
- In the Powershell window type chkdsk /f /r /x and press Enter to start the utility.
- To confirm the scan, press Y. The utility will scan the disk after the PC restart.


Run Chkdsk in Windows Recovery Environment
When the Windows operating system fails to boot normally or becomes faulty and unresponsive, running the Check Disk utility through File Explorer, CMD, or Powershell may not be possible. Loading the computer into the Windows Recovery Environment is the only option to access the disk fix utility. The system loads just the necessary processes and drivers in this environment. From there, you can load check disk utility to eliminate errors.
- Start your computer and wait until the Windows logo appears.
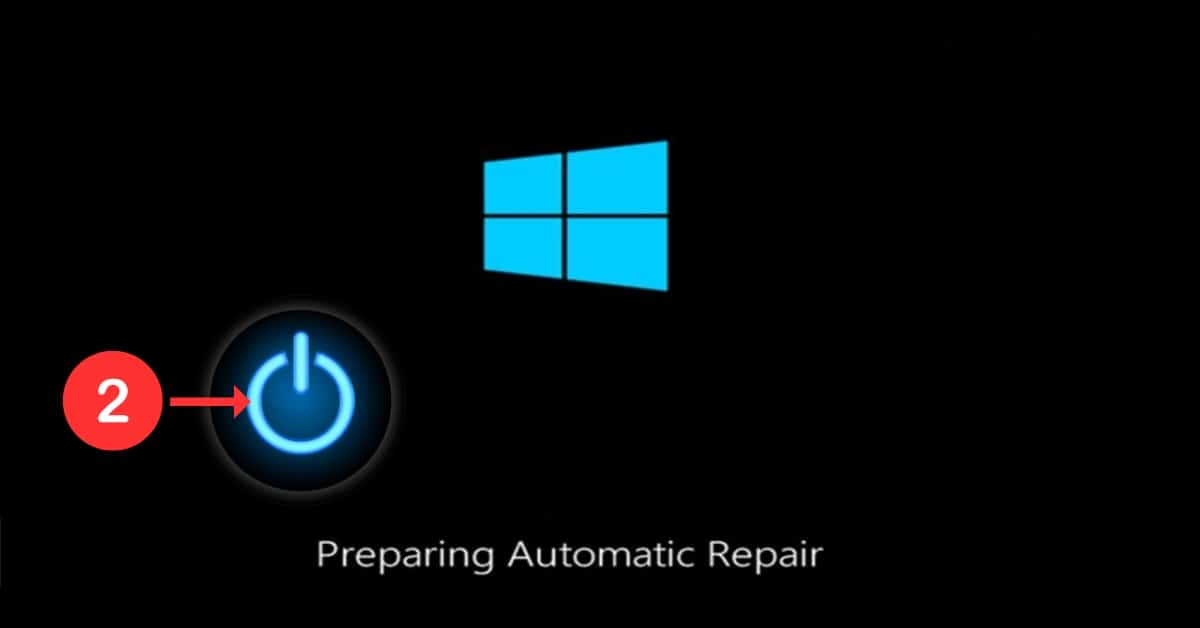
- As soon as you see the logo, press and hold the power button until your computer shuts down. Repeat this process a couple of times until you see the message Preparing Automatic Repair.
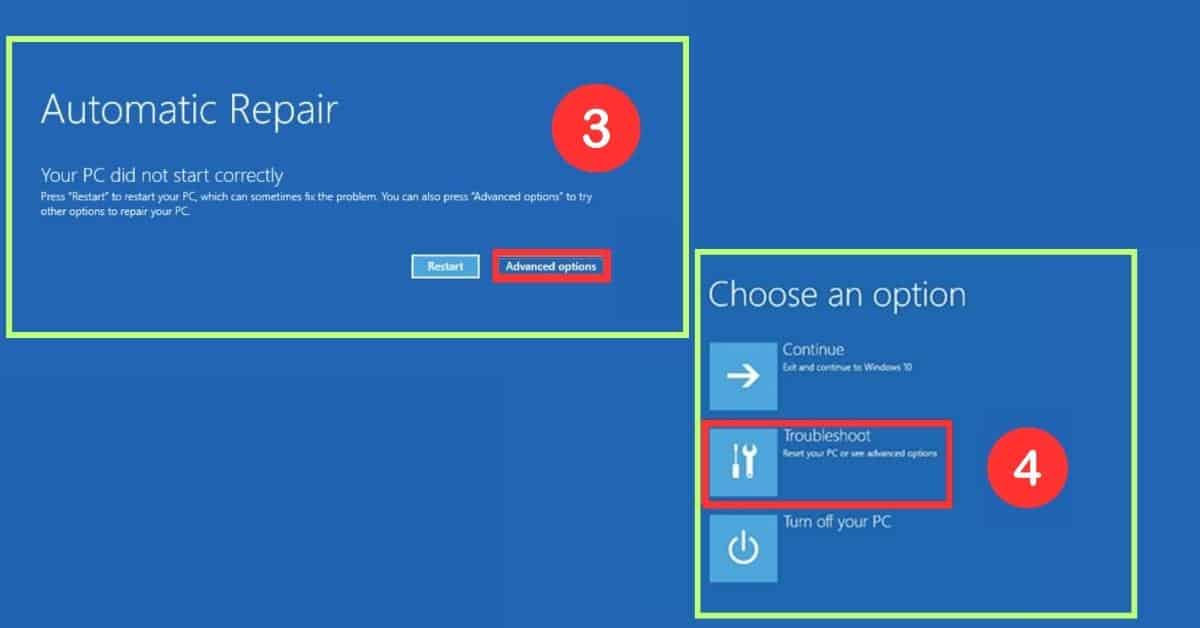
- On the Automatic Repair window, select Advanced options.
- In Advanced options window click on the Troubleshoot option.
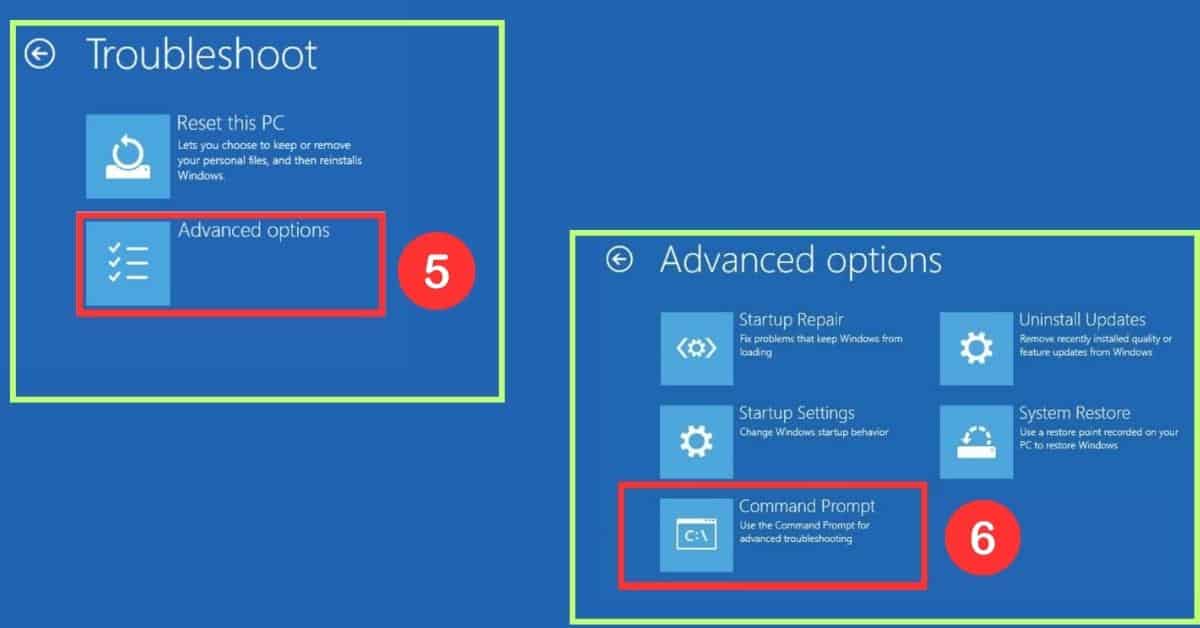
- In the troubleshoot window, select Advanced options again.
- Finally, select Command Prompt to open the CMD window.
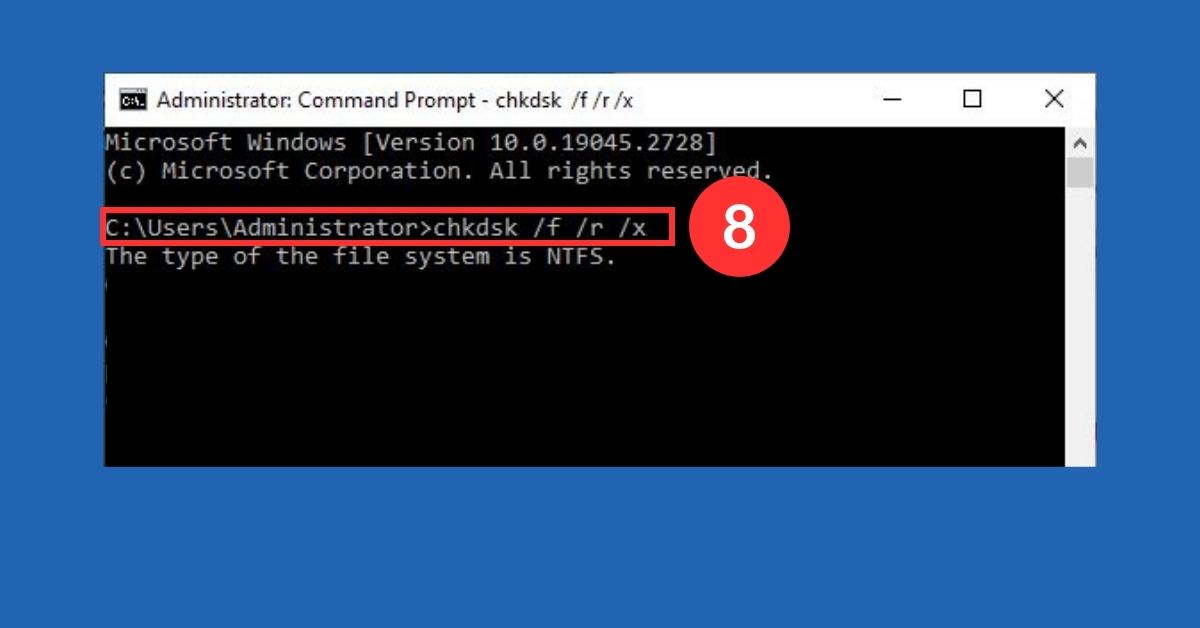
Once you have the CMD window open, you can use a fix utility solve the issue you’re having:
- In the CMD window, type chkdsk /f /r /x.
- Press the Enter key on your keyboard and wait for the command to run.
Schedule Chkdsk Disk Scan in Windows Using Task Scheduler
The hard drive is an essential factor that determines the speed and stability of your computer. An effective way to maintain stable performance on Windows OS is to schedule an automatic Check Disk scan every week or month on the Task Scheduler.
- In the search box, type Task Scheduler, on the right side of the Task Scheduler window click on Run as administrator option.
- Once Task Scheduler loads, in the top-left corner click on the Action tab.
- On the drop down menu select Create Basic Task options.
- On Create Basic Task tab in the Name field, enter – Scan Disk and click Next to continue.
Choose how often you want the task to run. The best to setup when the computer will be on but not in use.. The options are: Daily, Weekly, or Monthly. Click Next.
- Set the time and day you want the task to run. Choose a time when your computer is likely to be on, but not in use. Click Next.
- Choose Start a program option and click Next.
- In the Program/script field, type cmd .exe and in the Add arguments field, type chkdsk [drive letter]: /f /r /x and click Next.
- Review the summary window and create the task by clicking Finish button.


Run Chkdsk With a Batch file on Multiple Computers in All Windows Versions
Creating a batch file to run Check Disk is a great option if you need to run it on multiple computers. Computer users who use any Windows OS version, including Windows 11, Windows 10, Windows 8.1, Windows 8, and Windows 7, can share this file. The .bat file can be emailed or transferred through a flash drive, and etc. The utility can be launched with just one click as many times as needed.
- Open Notepad, to do it press the Windows key + R In the Run dialog box, type Notepad and hit OK.
- In the Notepad document, copy/paste: chkdsk C: /f /r /x
- Save the file by clicking, on the File menu and, select Save As.
- Name the file CHKDSK.bat and click Save. (important to add .bat)
- Right-click on the saved CHKDSK.bat file and open it with Run as administrator option.


Understanding CHKDSK Messages and What They Mean
CHKDSK (short for Check Disk utility) displays useful information after the disk scan is finished. This information contains with details of errors and issues that were detected and repaired during the scan.
Windows has scanned the file system and found no problems – This note indicates that no issues were detected on the Disk.
Windows has scanned the file system and found errors – This massage notes that chkdsk utility has detected errors drive. Also will be provide information about the type of error and was repaired or not.
Windows has made corrections to the file system – The pop-up provides information that chkdsk fix toll repaired all issues that during the scan.
Windows has checked the file system and found no problems – This announcement means that Disk Check chkdsk done deep scan of the hard drive.
An unspecified error occurred – The chkdsk repair utility was occurred by an error and the scan was incomplete.
Windows has made corrections to the file system – This message indicates that errors was found and fixed in the file system.
Understanding the Check Disk (CHKDSK) Utility Report Numeric Codes
After a disk scan, the Disk Check utility generates a report of numeric codes 0, 1, 2, and 3 that provide valuable information about the completed task. This information is helpful for further troubleshooting and resolving any errors or issues with the disk.
- 0 – No errors were found on the drive.
- 1 – The fix utility has successfully detected and fixed errors on the hard drive.
- 2 – Disk cleanup could not be performed because the /f command was not executed.
- 3 – The Disk Check utility could not scan and fix errors because the /f command was not started.
How to View Check Disk (CHKDSK) Log Files in Windows
A Check Disk generates a log file after the given task is done. The log file provides information on errors that were detected and fixed, as well as what errors issues were detected but not resolved. It is valuable information for disk troubleshooting and resolving und-fixed hard drive issues.
- Press the Windows and R keys together to open the Run dialog box.
- In the command line, type eventvwr.msc and hit Enter.
- In the Event Viewer window on the left side menu, click the Windows Logs arrow to expand the menu and select the Applications option.
- In the Event Viewer window on the right side, menu select Filter Current Log option.
- In the Filter Current Log window, navigate to the Event sources drop-down menu and select Chkdsk and Wininit sources.
- Click OK to filter these two sources.
- Double-click on Chkdsk and Wininit to view the results.


Check Disk is a built-in utility in Windows that checks for errors on hard disk drives and corrects them.
The easiest way to run the Check Disk utility is to select the drive you need to check, right-click on it, click the Tool tab and hit the Check button. Properties>Too>Check
Check Disk looks is a hard disk repair utility that fixes volume errors, bad sectors, lost clusters, cross-linked files, and directory errors.
The time it takes for Check Disk to complete the scan depends on the PC's performance and the hard drive's size. The task for Windows 11 and Windows 10 users who scan 500 GB should take a couple of hours.
running "chkdsk /f /r /x" will perform a thorough check of your hard drive, fix any errors it finds, recover data from bad sectors, and exclude any volumes that are currently in use from the check.

